|
|
|
 |
|
|
|
UNLOADING THE KILN |
 |
|
|
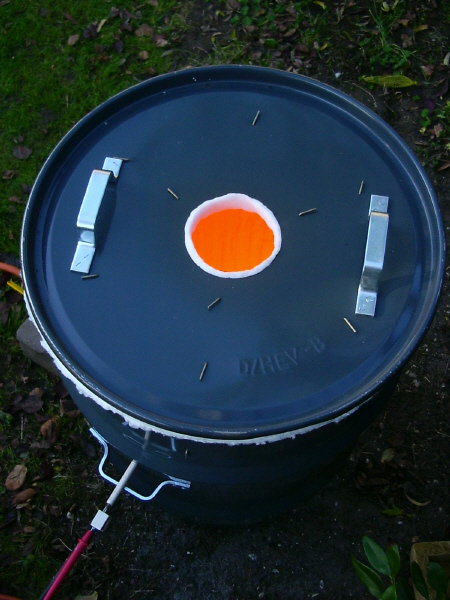
Once the temperature has reached 900 °C the pyrometer (if used) is of less interest. We recommend you to get used to decide whether the firing is done or not on the bases of what you see in the kiln rather than what the pyrometers indicates. Through the flue gas port in the kiln cover you can carefully look into the kiln from a side.
|
Important
|
Hot air, capable of burning both hair and eyebrows in a split second, leaves the kiln at the flue gas port. Do not come directly above the flue pas port to check the ware. Wear protective glasses and gloves and keep your hand before you face for protection. Look into the kiln from a side. Consider this already when you load the kiln. Make sure that you can have a view on the most critical piece of ware in the kiln without being directly above the flue gas port. Check this before starting the firing procedure.
People (visitors) who have nothing to do with the firing require your special attention. Everyone is quit attracted by the red/orange/yellow glow in the kiln. Before you know it they want to take a look not being aware of the flue gas that comes out.
Take your precautions and make sure that you have it under control. Be sure that no one can check the kiln without your notice.
|
|
|
|
|
To check if the glaze is done you can shine with a torch on the ware in the kiln. Glaze that is not ready yet will look mat, without any shine. Glaze that starts sweating, or bubbles or foam that appears on its surface proves that we are close to the melting temperature. Glaze that has melted will give you a nice shiny and twinkling look when you light with a torch. Now the firing is ready and can be stopped.
First we turn back the lever of the pressure regulator in such a way that we are back to the small flame that we had during the preheating of the kiln (Section A – firing process). Turn back the lever until the pressure is virtually 0. Simply imagine that the flame that you will have when you shut off the burner will be the flame that you get when you ignite it again. Having done that you can shut the ball valve at the burner. Use 1 hand to keep the burner in place the other one to shut the valve.
Although you may give the kiln and the ware a short time now (10-30 sec. max.) for the first temperature shock it is certainly not the time for a cup of coffee and leave that mobile phone ringing if you didn't switch that off before you started..... No time for that now.
Carefully remove the cover of the kiln. Be prepared for the heat that will come out. Put the cover somewhere where it is save so you cannot step on it while being concentrated with unloading the kiln. Make sure that it does not set anything on fire (dry grass or leaves).
Now it is time to unload the kiln. For heavy or difficult pieces or if you feel unsure you can always ask someone to be ready with a spade to provide extra support for your ware as soon as you have lifted it beyond the kiln edge. Put the ware beside the kiln for the temperature shock necessary to get the glaze to crackle. If there a more pieces to unload make sure that you do not hit the ones that are already unloaded.
With fragile ware with thin walls (thrown or casted) it is better that you heat up your tongs shortly above the flue gas port just prior to the unloading. Not red hot though. But when you when you take this fragile work in a very cold pair of tongs that this may be the reason of damage.
|
Printable Version
|
|